This is by far the softest cake i've ever made and tasted. The cake uses creamcheese and beated eggwhites. The key to perfecting the texture is folding the cake mixture into the egg whites. You will need to fold it gently so that the egg whites does not deflate.
The filling was white chocolate butter cream and grated cheese. Outside are chocolate flakes that I have made extra extra thin so that it wouldn't dominate the taste of the cake.
Another tip, when baking this cake, the cake rises quite a lot when baked, so do not put too much in you baking pans or it will overload.
January 13, 2012
October 18, 2011
Birthday Cake
This is my niece's birthday cake. She is one year old this October. I filled the cake with stereo-foam instead of real edible cake so that I can work on it slowly. The cake was displayed on the 16th of October 2011 in LaLuna, Semarang. The theme was vintage. Granted my cake wasn't exactly on theme, it was beautiful enough.
This is the bottom layer of the cake. It is layers of white ruffles handmade one by one, and drapes of babyblue fondant and golden fondant ropes made using gold edible powder. This is probably the hardest part of the cake; ruffles, drapes, and ribbons. Sure they were painful to make, but definitely worth it!
This, as you can guess, is the middle layer it is soft pink with curls and waves made with white rolled fondant. I actually was going to leave the top part empty, but my sister commented that it was too empty. So I made these teensy little flowers to fill up the emptiness but still containing some subtle-ness. THEN, my mother saw them and added the pink part in the middle of each and every flower.
The picture above is the top layer of the cake. It is purple covered with handmade flowers and to smooth the transition from pink to purple, I made little balls of fondant and paint them slightly with silver duster to make them look like pearls and place them so.
Now for the topper I made half a bird cage with fondant and wire, top them up with white feathers and fill them with these two adorable birds I bought in a local arts and crafts shop. Simple enough except the fondant takes ages to dry and they seem to wobble a bit at first.
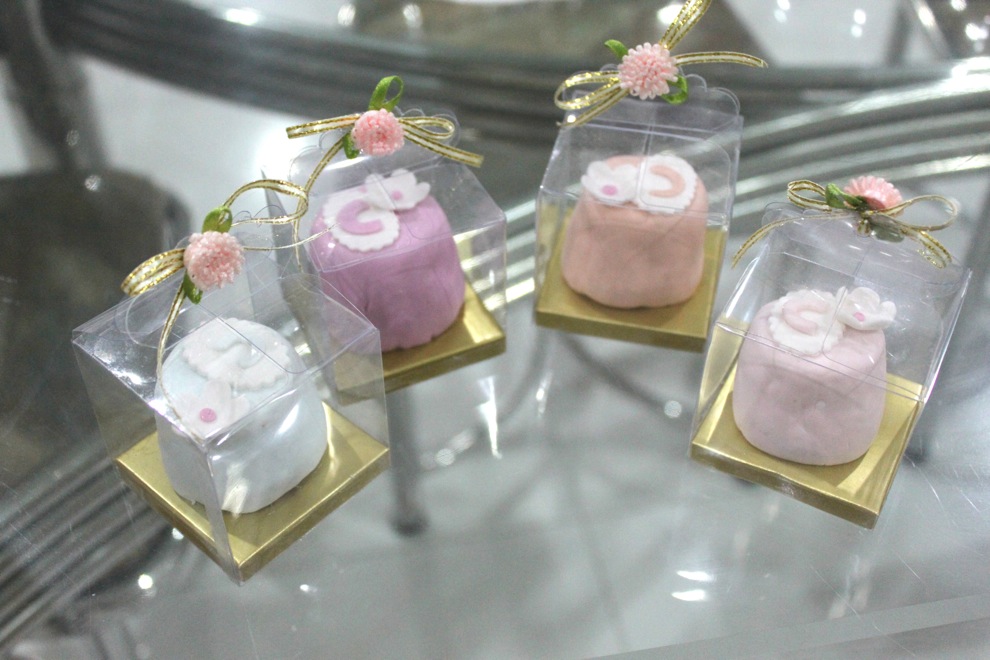
To finish the cake. I added six butterflies, pearls, feathers, and these plaques of my niece's name. I made the plaques to be put on top of fondant-covered small cakes I originally planned to make. However, for some reason I decided to bail on the plan and made forty of these tiny cakes (below) to give out to small children and guests at the party.
These little babies are upside down tiny cupcakes, covered in fondant, topped with a flower that's matched with the ones on top of the cake and tiny plaques with the letter "C" on it. (C is for Charlene, the birthday girl). So that's the story. :D
September 24, 2011
A 'whatever-i-have-at-home' apple n apricot pie
I was poking around the fridge to see what I have in there and cook it for dinner and I found two granny smith apples that I bought a while ago to make apple strudel. I decided to turn them to apple pies. Since there were only two of them I needed a smaller pan than the one i have so I put them in small disposable tart pas thing (I have no idea what they are called, but they're made of aluminum). So that is why my pies are so small.
Why apricot you may ask, same reason as above really, not enough apples and I had some apricots in the fridge too. I didnt measure anything I put in there, but it turned out to be so good, esp the bottom crust. Though I cant give you the exact measurements of the ingredients, I can give a list of what they are:
Base - unsalted butter, plain flour, sugar, crushed almond, salt
Fill - apples (2), apricot, sugar, water, cinnamon powder, vanilla powder, salt, butter (add sultana next time)
Top - puff pastry, evaporated milk to be brushed on top, crushed almond
Here is a photo of them straight out of the oven. They smell incredible with the taste of apricot and apple combining so well inside. They tasted so warm and classic. True comfort food.
September 16, 2011
Japanese Cheese Cupcake
This is a mini version of Japanese cheesecake. They're still topped with fresh fruits and taste as delicious as the original size. The only downside to is you will have to ask for more than just one.
I used the recipe in a book entitled Japanese soft cakes (indonesian book). The recipe yields very pleasing results as the cakes (cupcakes) tasted creamy yet fresh because of the lemon rind and juice. I have to admit it is not as soft as I had imagined before, maybe due to the fact that I did not stir the cream cheese until it became super soft.. (I was scared it will turn oily). Other than that, this is one recipe worth making.. and eating. *om nom nom nom*
September 4, 2011
Broccoli soup
Had some leftover broccoli so I decided to make cream of broccoli soup. It was surprisingly good. Very smooth texture wise and tasty. I toasted some wholewheat bread on top.
Soup: broccoli, cream, cheese, pepper, salt, stock, butter, garlic (if u like)
Tips: If you want a really good colour, do not use the stalks. Although it would be quite a waste to throw them away.
Chocolate Filled Choux Pastry
Simple and Yum!
Choux Pastry
Ingredients
1/2 cup (70 grams) all purpose flour
1/2 teaspoon granulated white sugar
1/4 teaspoon salt
1/4 cup (4 tablespoons) (57 grams) unsalted butter
1/2 cup (120 ml) water
2 large eggs, lightly beaten
Directions
Preheat oven to 400 degrees F (205 degrees C) and place rack in center of oven. Line a baking sheet with parchment paper.
In a bowl sift together the flour, sugar and salt. Set aside.
Place the butter and water in a heavy saucepan over medium heat and bring to a boil. Remove from heat and, with a wooden spoon or spatula, quickly add the flour mixture.
Return to heat and stir constantly until the dough comes away from the sides of the pan and forms a thick smooth ball (about a minute or two). Transfer the dough to your electric mixer, or with a hand mixer, and beat on low speed a minute or two to release the steam from the dough. Once the dough is lukewarm start adding the lightly beaten eggs and continue to mix until you have a smooth thick paste. Spoon or pipe 12 mounds of dough onto the baking sheet, spacing them a couple of inches apart. Beat together the egg and salt for the glaze. With a pastry brush, gently brush the glaze on the tops of the dough.
Bake for 15 minutes and then reduce the oven temperature to 350 degrees F (177 degrees C). Bake for a further 30 to 40 minutes or until the shells are a nice amber color and when split, are dry inside. Turn the oven off and, with the oven door slightly ajar, let the shells dry out for a further 10 - 15 minutes. Remove from oven and let cool on a wire rack.
For whipped cream: In a large mixing bowl place the whipping cream, vanilla extract, and sugar and stir to combine. Cover and chill the bowl and whisk in the refrigerator for at least 30 minutes. When chilled, whip the mixture until soft peaks form.
Rainbow Lapis Legit
Lapis legit is originally made with spices like cinnamon and star anise. But since I like neither of the two I have decided to make my own lapis legit. Mine is a combination of four flavours, they are pandan (green), chocolate, vanilla (yellow), and rose (pink). The recipe alone is very simple and doesnt require much skill. Though one particular skill is truly essential to make this cake, that is PATIENCE. lots of it. As you can imagine, to make this layered cake I have to bake each layer one by one. Other than that, I reckon anyone would have no problem making this yummy and absolutely sinful cake.
Lapis legit
A. Egg white – 4
B.
Egg yolk 18
Icing sugar 125gr
C.
Butter 200gr
Margarine 300gr
D.
Flour 125gr
Evaporated milk ½ can
Mix a, b, c SEPARATELY. Then combine, add D.
Divide and give flavour/colour. Bake layer by layer. Brush with extra butter per layer.
Top with almonds if desired
Subscribe to:
Posts (Atom)